How to auto-fill web forms from a CSV or Excel file with a form filler Chrome extension
The spreadsheet is ready: 300 customers, orders or products, one per row. The website where they have to go is a plain web form with a Save button. There is no import feature, no API, and nobody is going to build one for you this week. So someone sits down and copies the cells one by one: name, Tab, email, Tab, pick a plan, click Save, next row.
That is two or three minutes per row and a full day for a few hundred. It is also where typos come from, because nobody stays sharp on row 214. This guide shows how to let the browser do that work: record the form once, then let it fill and submit the form for every row of your file.
Why web forms do not take a spreadsheet
Most business web apps were built for people typing one record at a time. A bulk import is extra work for the vendor, so it is often missing, hidden in an expensive plan, or limited to a few fields. Supplier portals, government sites and older internal tools are the usual suspects.
Chrome's own autofill does not help here either. It remembers one set of details, such as your name and address, and offers them again. It has no idea that row 1 is “Acme Corp” and row 2 is “Globex”. What you need is a tool that knows three things: which field gets which column, how to submit the form, and how to start again with the next row.
Your options for data entry automation, compared
1. Copy and paste by hand
No setup, and fine for ten rows. Beyond that it is slow, boring and error-prone. Two people splitting the list only halves the pain.
2. A profile-based autofill tool
Many autofill extensions save a profile (name, phone, address) and paste it into any form. That is great for signing up on sites with your own details. It is the wrong tool when every submission needs different data, because you would have to edit the profile before each row.
3. The website's own import
If the system you type into has a CSV import, use it. It is the fastest and most reliable route, and the vendor supports it. Check the settings and help pages, or ask support, before you automate anything else.
4. A script (Python with Selenium or Playwright)
A developer can write a program that opens the form and fills it for every row. It is very flexible. It also means installing tools, writing code, and fixing that code when the site changes. For a one-person office task it is usually more than the problem deserves.
5. A form filler Chrome extension that records and replays
You fill the form once while the extension records what you do. Then you load the spreadsheet, tell it which column goes into which field, and it repeats the task for every row in your own browser tab. No code, and you stay logged in as usual. Our free extension MacroClerk works this way, and the steps below use it.
| Method | Different data per row | No coding | Works on any form | Setup |
|---|---|---|---|---|
| Copy and paste | Yes | Yes | Yes | None, but slow |
| Profile autofill | No | Yes | Mostly | Minutes |
| Site's own import | Yes | Yes | Only that site | Minutes, if it exists |
| Script | Yes | No | Yes | Hours |
| Record and replay with CSV | Yes | Yes | Most forms | About 10 minutes |
Step by step: fill a web form from a spreadsheet
Step 1. Prepare the spreadsheet
- Put one submission per row and clear column names in the first row. Names that match the form labels help: if the form says “Company name”, call the column
CompanyorCompany name. - Write values exactly as the form expects them. For a dropdown, use the text of the option (“Pro”, not “pro plan”).
- Save it as CSV. MacroClerk reads CSV files, not .xlsx. In Excel choose File → Save As → CSV UTF-8. In Google Sheets choose File → Download → Comma-separated values. Files separated by commas, semicolons or tabs all work, and cells with line breaks inside quotes are read correctly.
Step 2. Install the extension and open the side panel
Add MacroClerk from the Chrome Web Store and pin its icon to the toolbar. A click on the icon opens the side panel next to the page. If the form was already open in a tab, reload that tab once so the extension can see it.
Step 3. Record the form once
- Open the empty form in a normal tab.
- In the side panel press Record new macro. MacroClerk adds an Open step with the page address first, so every row later starts on a fresh form.
- Fill the form with any sample data: type into the fields, pick the dropdown options, tick the boxes, then click the submit button.
- Press Stop recording.
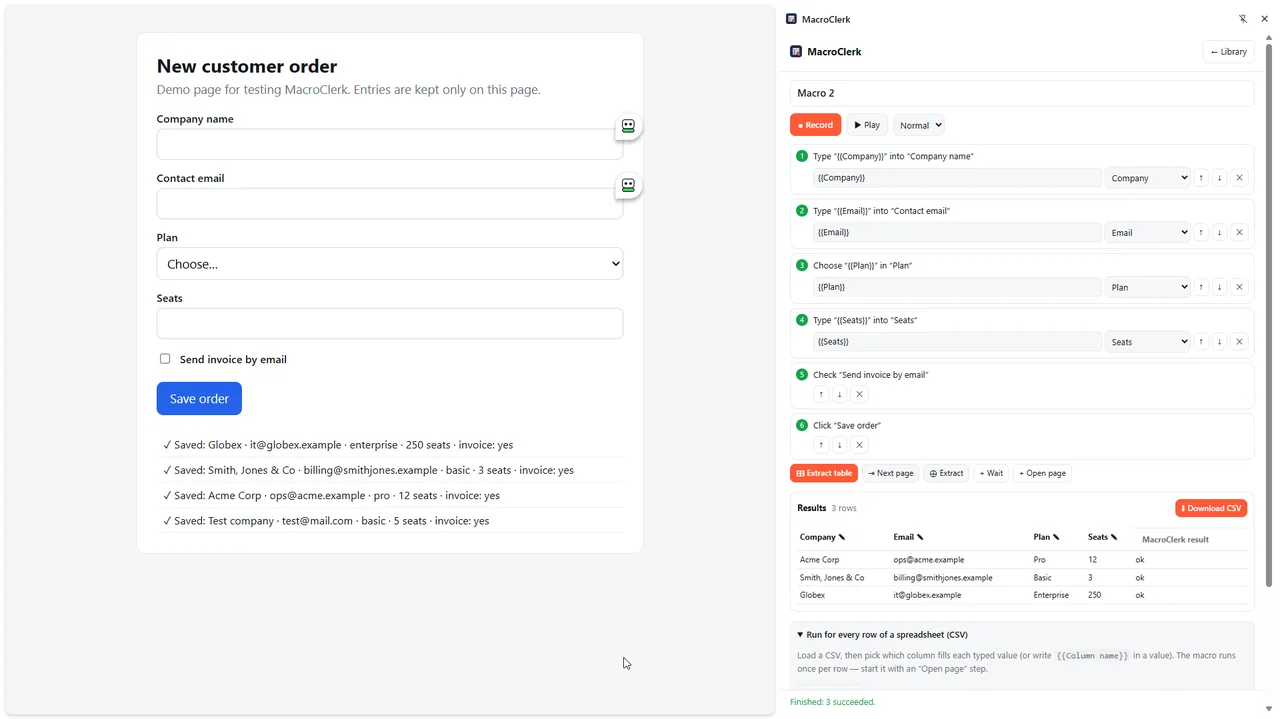
Each action now shows in the panel as a plain-English step, such as Type “Acme” into “Company name” or Click “Save order”. You can delete a step, move it up or down, or change its value.

Step 4. Load the CSV and connect the columns
- Open the section Run for every row of a spreadsheet (CSV) and press Load CSV file.
- MacroClerk matches columns to fields with similar names by itself. A
Companycolumn lands in the “Company name” field without you doing anything. - For any field it could not match, pick the column in the dropdown next to that step. You can also write
{{Column name}}into a value, for exampleOrder for {{Company}}.
The panel shows the file name, the number of rows and the column names, so you can check you loaded the right file.
Step 5. Run a test, then run all rows
Before the big run, make a copy of your CSV with only two or three rows and run that. Watch the tab: the form fills, submits and starts over for the next row. When it looks right, load the full file and press Run for all rows (the button shows the real count, such as “Run for all 300 rows”).
While it runs you can Pause, fix something on the page and Resume, or Stop at any moment. The speed menu offers Slow, Normal and Fast.
Step 6. Check the results
When the run ends, the panel says how many rows succeeded and how many failed. The results table repeats your input columns and adds a MacroClerk result column with ok or the error for that row. Press Download CSV to keep it as a log, filter the failed rows in Excel, fix them and run only those again.
Tips for reliable data entry automation
- Start every row on a fresh page. Keep the Open step at the top. Without it, each row continues wherever the previous one ended, and MacroClerk asks you to confirm before running like that.
- Wait for slow pages. Each step already waits several seconds for its field to appear. If the site shows a spinner after saving, add a + Wait step and move it after the submit click.
- Prefer Normal or Slow speed on busy business apps. A few extra seconds per row costs less than a failed row.
- Use the text of dropdown options in your sheet. Searchable dropdowns on modern sites work too, as long as the value matches an option.
- Keep a backup of the original file. The results CSV is a new file, so your source stays untouched.
Troubleshooting
“Columns not found in CSV”
A step refers to a column name that is not in the file, often because of a typo or an extra space in the header. Rename the column in the sheet, or pick the right one in the step's dropdown.
Every row typed the same values
None of the steps uses the spreadsheet yet. MacroClerk warns about this before it starts: pick a column next to each typed value, then run again.
The form needs a password
Passwords you type while recording are never saved. Log in to the site yourself before the run. If the password step is part of the macro, the run stops there and asks you to fill it in.
A step fails on some rows
Look at the error in the results table. Common causes are an option that does not exist in the dropdown or a value the site rejects, such as a phone number in the wrong format. Fix those cells and run the failed rows again.
The site asks if you are human
MacroClerk pauses at any “are you human” check. Solve it yourself in the tab and press Resume. It never tries to get around such checks.
What it does not do (yet)
To keep expectations honest: MacroClerk does not read .xlsx files directly (save as CSV), does not upload files into file fields, does not work inside embedded frames (iframes), and has no scheduler. It runs in your open tab while the browser is on.
Frequently asked questions
Can I fill a web form from Excel directly?
Not from an .xlsx file. Save the sheet as CSV UTF-8 first; it takes a few seconds, and Excel keeps your original workbook.
Is a form filler Chrome extension safe for business data?
It depends on the extension. MacroClerk stores macros and spreadsheets only in your browser and does not send the pages you visit or your data anywhere. Check your company's rules on browser extensions all the same.
How many rows can I run?
Every feature is free, with no row limits and no account. Large files work the same way as small ones; the run simply takes longer.
Does it work on React and other modern web apps?
Yes. MacroClerk works on sites built with React and similar frameworks, including searchable dropdowns. Each step finds its field by several clues (label, name, placeholder and more), so small page changes do not break it.
Summary
If the website has a CSV import, use it. If it does not, you do not have to copy cells by hand or write a script. Record the form once, load the spreadsheet as CSV, connect the columns and let the browser submit one form per row. Test with a few rows, then download the results to see which rows went through.